The Canadian Snow-Ready Roof: How to Prepare Your Home for Harsh Winters
Practical Guidance For Protecting Your Roof From Snow, Ice, And Deep Cold
By
Published: March 12, 2026
Updated: March 21, 2026
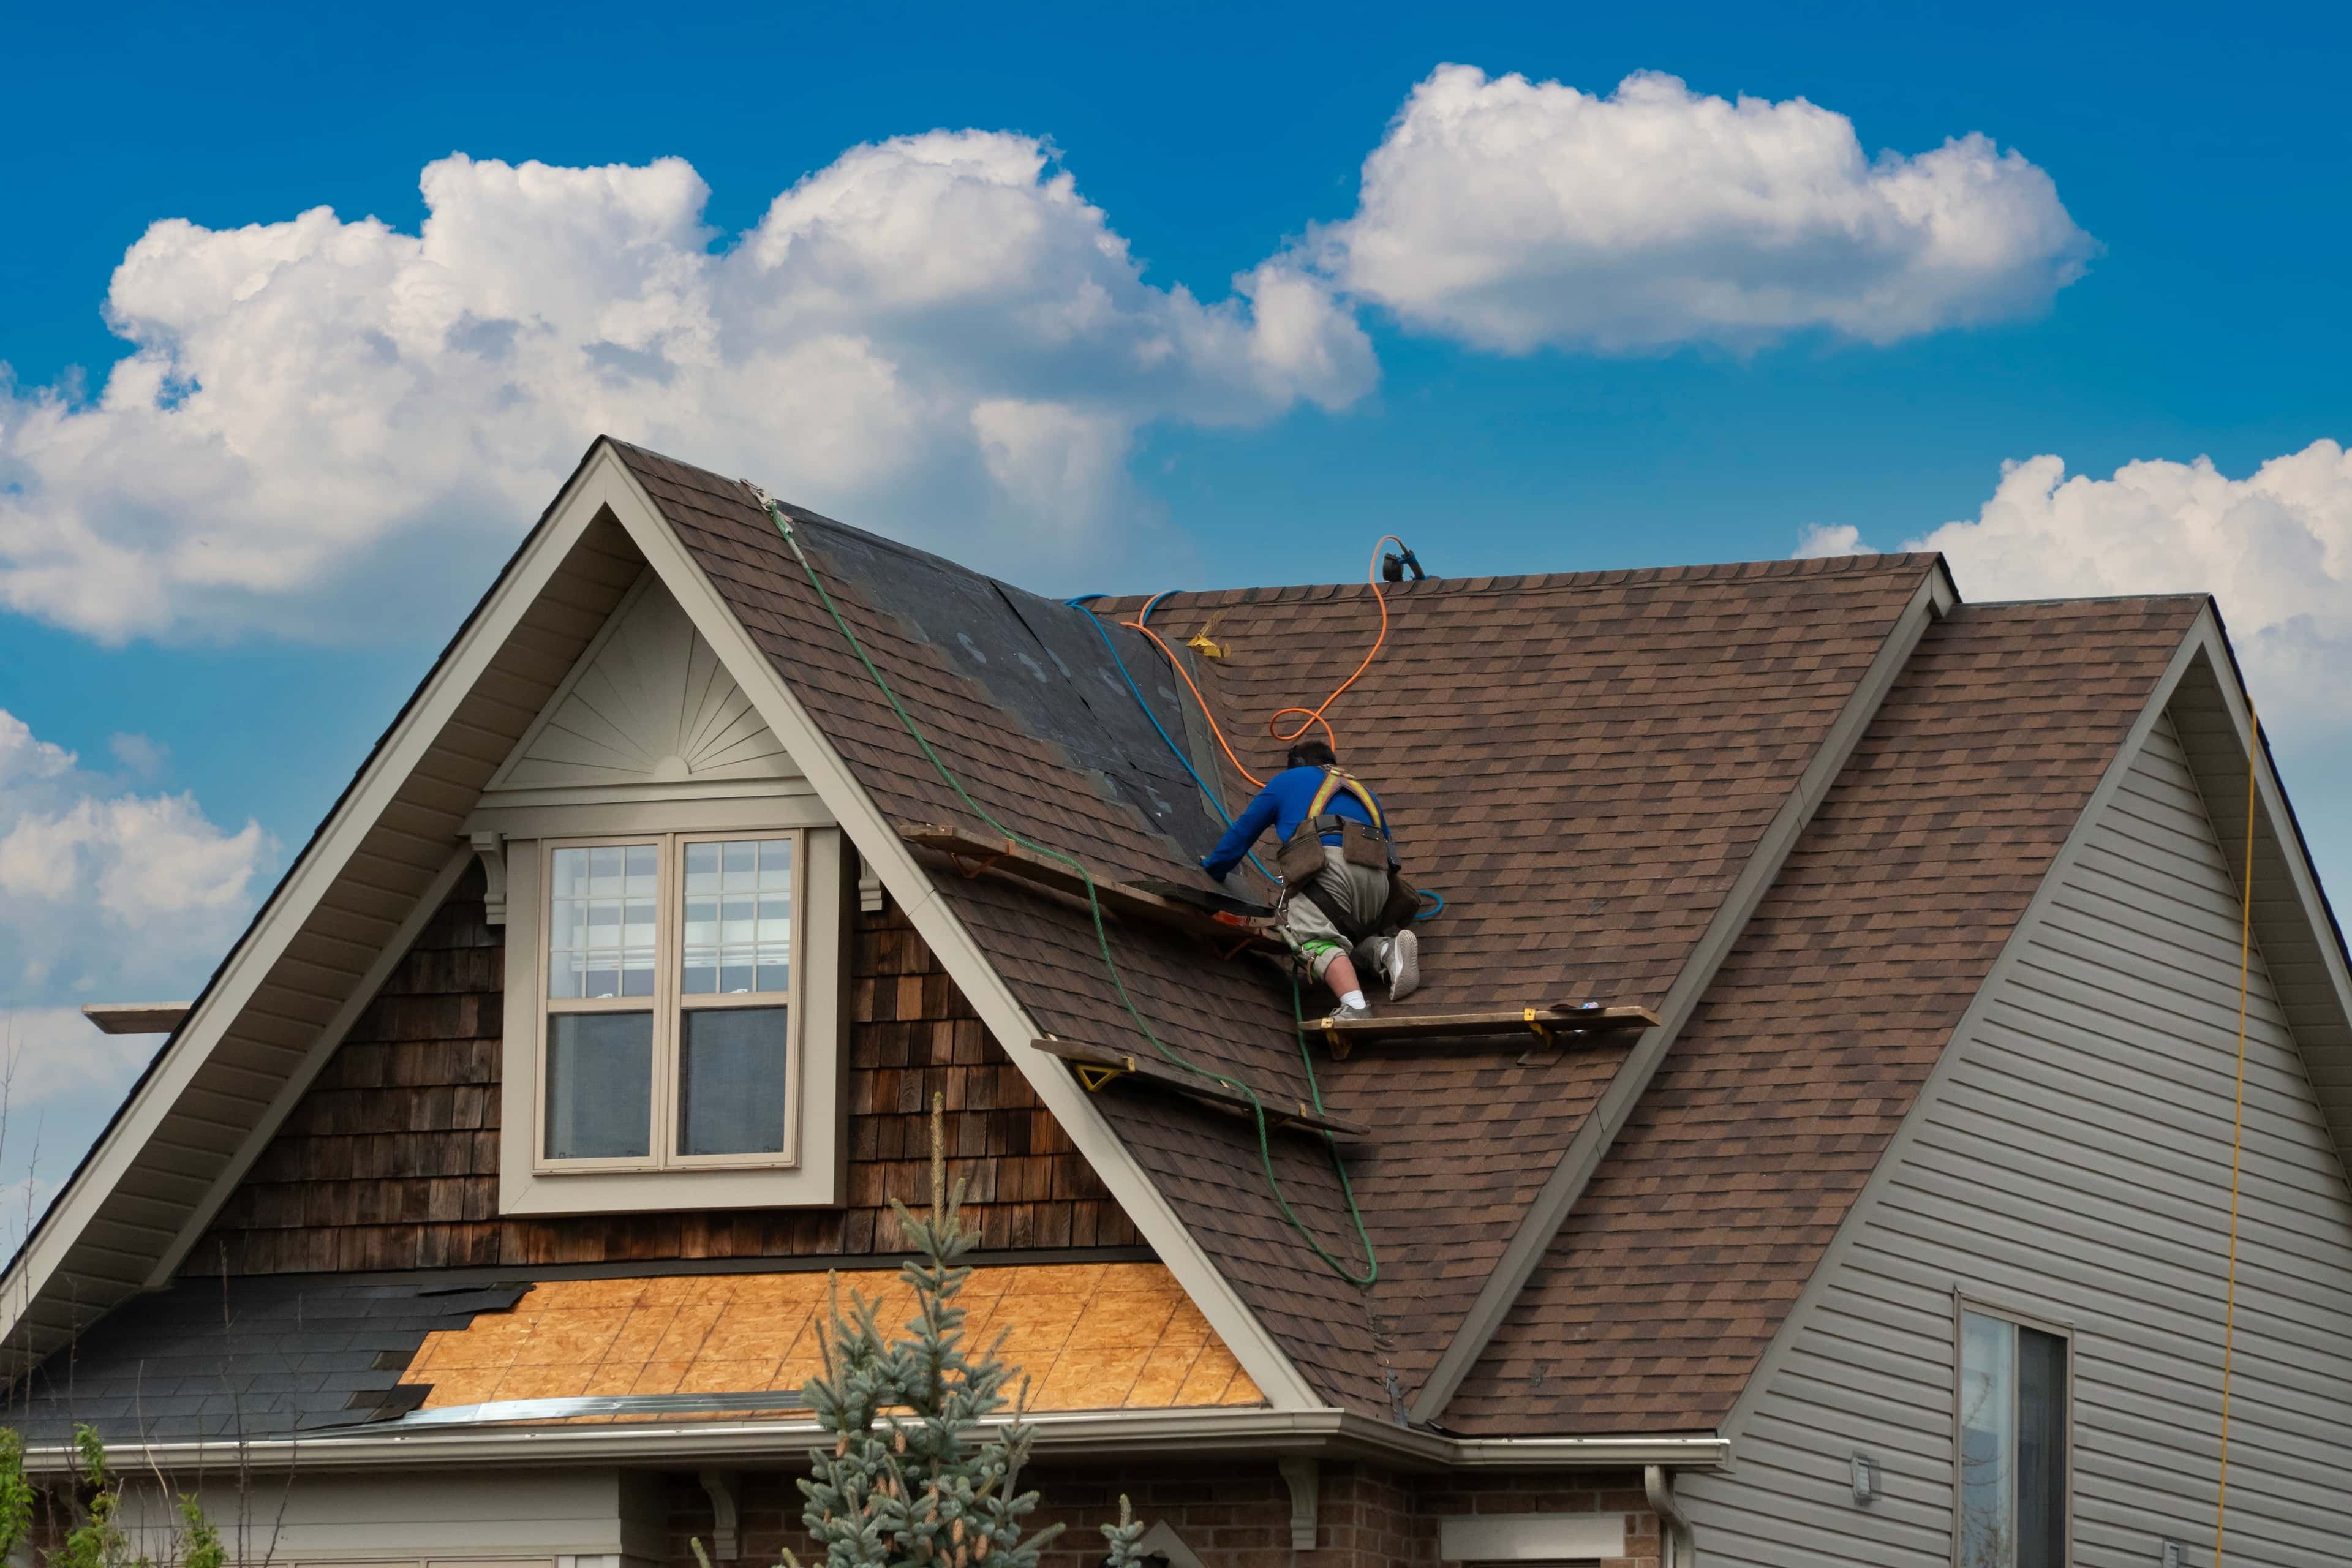
Snow-laden roof edges hint at ice dams forming where heat loss meets winter’s heavy load. (Credit: Homeowner.ca)
Key Takeaways
•A snow‑ready roof is designed for weight, not just snow depth, and local Canadian snow loads vary widely by region and roof type.
•Ice and water shield at eaves, valleys, and penetrations is a critical leak‑defence layer but cannot replace good attic air sealing, insulation, and ventilation.
•The most powerful winter upgrades happen below the shingles: air‑sealing the ceiling, topping up attic insulation, and keeping vents clear and balanced.
Canadian winters ask a lot of a roof. One week you might get fluffy, wind‑blown powder; the next, a rain‑on‑snow event that turns everything heavy, dense, and unforgiving. Your roof has to quietly manage all of that weight, shed meltwater safely, and keep the heat where it belongs—inside the house, not leaking into the attic.
Most modern Canadian roofs are built to withstand a minimum roof snow load of about 1 kilopascal (kPa), or roughly 21 pounds per square foot, according to the National Research Council of Canada’s snow‑load discussion in Codes Canada – Frequently Asked Questions which sets the baseline structural expectation under the National Building Code. That minimum increases in snowier regions, and many newer homes are designed for higher loads, but code design is only the starting point for winter readiness.
Winter problems rarely start with a single factor. Roof damage and ice‑related leaks usually show up where structure, waterproofing, and building science aren’t working together: a low‑slope section that collects drifted snow, an exposed valley without enough membrane beneath the shingles, or a warm attic that melts snow on the upper roof while the eaves stay frozen. A snow‑ready roof treats all of these as one system.
This guide breaks that system into four practical parts: understanding snow loads and what your roof is likely designed to handle, placing ice and water shield where it does the most good, building a focused pre‑winter maintenance checklist, and reducing attic heat loss so your roof stays colder and less prone to ice dams. Along the way, we will connect back to Canadian building‑code and energy‑efficiency guidance, such as Natural Resources Canada’s Keeping the Heat In series on roofs and attics in Section 5 of its online guide which emphasises that controlling heat and air movement is central to winter roof performance.
The goal here is not to turn you into a structural engineer or roofing contractor. It is to give you enough context and practical checklists that you can spot risk, ask better questions, and invest in upgrades that actually move the needle before the snow arrives.
Understanding Snow Loads On Canadian Roofs
Why Weight Matters More Than Snow Depth
Homeowners often ask, “How many centimetres of snow are too much for my roof?” From a structural perspective, that is the wrong question. It is the weight—not the depth—of snow that matters, because fluffy, cold snow weighs far less per centimetre than wet, compacted snow, as explained in the National Research Council of Canada’s snow‑load guidance in Codes Canada – Frequently Asked Questions which compares light fluffy snow to slushy, heavy snow on the same roof.
In simple terms, the National Building Code expects roofs to be designed based on historical snowfall records that are converted into location‑specific snow loads, and then expressed as a minimum design pressure in kilopascals or pounds per square foot, according to the National Research Council of Canada’s explanation of roof snow load tables in its Codes Canada FAQ which ties design values to long‑term climate data. For typical smaller buildings and houses, the code uses a simplified snow‑load equation but still enforces that minimum of about 1 kPa (≈21 psf), with higher design loads in regions that see more snow.
A Regina‑based roofing contractor notes that many modern Canadian homes are commonly designed for roof snow loads in the range of roughly 35–40 pounds per square foot, depending on local code and when the home was built, in a homeowner guide on snow loads from Everflow Roofing which uses that range as a typical—but not universal—target. That lines up with the idea that the 21 psf National Building Code minimum is just a floor; actual design values are often higher, especially in regions with known heavy snow or drifting.
Regional climate differences matter a lot. A snow‑retention manufacturer summarises typical design roof snow load ranges of around 1.8–3.0 kilonewtons per square metre (kN/m²) in provinces such as Ontario and Quebec, and 3.5–4.0+ kN/m² in very snowy areas like Newfoundland, Yukon, and Nunavut, in a Canadian snow‑guard guidance article from Safe Roof Experts which underscores how much more load northern and Atlantic roofs may be expected to carry.
To make this more concrete, here is a simplified picture of how design expectations change across the country. These numbers are illustrative, not a replacement for local building‑code tables:
Roofs are usually designed for substantial snow and some drifting, especially on wide spans.
Prairies (e.g., Regina, Winnipeg)
~1.8–2.2 kN/m² (≈40–45 psf)
Flat areas and winds create drifting; design accounts for higher local loads on some roofs.
Atlantic Canada (e.g., St. John’s)
~2.5–4.0+ kN/m² (≈50–80+ psf)
Very high snow and rain‑on‑snow events drive robust structural expectations.
Northern Territories
3.5–4.0+ kN/m² (≈70–80+ psf)
Structural design anticipates extreme snow and long winter loading periods.
Milder Coastal BC
~1.5–2.0 kN/m² (≈30–40 psf)
Loads are still significant but more often dominated by wet, dense snow events.
These ranges reflect the broad patterns highlighted for Ontario, Quebec, Atlantic Canada, and northern regions by Safe Roof Experts rather than exact code numbers, and the key takeaway is that there is no single “Canadian” roof snow‑load value.
Important
Treat any numeric snow‑load value you read online as guidance, not as a personal guarantee about your own house. Only a structural engineer, architect, or qualified building professional who reviews your specific roof framing, location, and construction era can confirm its actual design snow load.
How Roof Shape And Material Influence Snow Behaviour
Even if two roofs share the same code‑required design load, they likely do not carry snow in the same way. The National Research Council of Canada points out that low‑slope roofs and roofs with rough roofing materials tend to accumulate more snow than steeper and smoother roofs, and that snow often piles up in specific locations such as valleys, dormers, and shed roofs, as explained in the snow‑load section of Codes Canada – Frequently Asked Questions where local accumulation is highlighted as a key risk factor.
A U.S. Building America guidance article on managing snow loads on roofs and decks reinforces that roof geometry, parapets, and nearby higher roofs can create drifts and unbalanced loads, particularly where wind deposits snow into corners and transitions, in a technical resource on snow‑load management published by the Building America Solution Center which is widely used for cold‑climate design practice. Those same principles apply on Canadian houses with multi‑level roofs, attached garages, or additions.
Different roof materials also behave differently under snow:
Roof Type / Material
Typical Snow Behaviour
Winter Advantages
Winter Watch‑Outs
Asphalt‑shingle sloped roof
Holds snow fairly well; friction slows sliding
Familiar details; easy to repair; compatible with snow retention
Valleys and low‑slope areas can collect heavy drifts; shingles can be damaged by aggressive raking
Metal standing‑seam sloped roof
Smooth surface encourages sliding once snow releases
Sheds snow quickly; can reduce long‑term loading on upper slopes
Roof “avalanches” can dump large sheets of snow and ice; snow guards often needed above entries
Low‑slope or “flat” membrane roof
Snow tends to stay put, with significant drifting near edges and parapets
Simplified drainage layout; structure usually designed for high uniform loads
Ponding risk during rain‑on‑snow; local overloads near mechanical units and parapets
Complex multi‑level roofs with dormers
Major accumulation zones at step‑downs, valleys, and where upper roofs dump onto lower
Architectural interest and daylighting
Localised overloads where snow drifts or slides onto smaller areas; hard to inspect and clear
The combination of low slope, rough materials, and geometric traps like valleys is exactly why the National Research Council of Canada highlights these areas as places where you should “pay special attention” for local snow accumulation in the snow‑load guidance within Codes Canada – Frequently Asked Questions which lists features such as dormers, valleys, and shed roofs as common hot‑spots.
Note
When you look at your own house, think less about the average snow depth and more about “where does the snow want to pile up or slide to?” Those are the locations that deserve extra attention in your winter plan.
Advertisement — Article Continues Below
Planning Ice And Water Shield For Winter Performance
What Self-Sealing Membranes Do In A Snow Climate
In a Canadian winter, shingles alone are not your primary defence against water. The hidden layer that matters most at the roof edges and other vulnerable spots is the self‑sealing membrane often called “ice and water shield,” which adheres directly to the roof deck and seals around nail penetrations.
Natural Resources Canada explains that installing a self‑sealing membrane under the shingles at the lower part of the roof is an important measure against ice‑dam related leakage, and notes that Canadian building codes require these membranes along the lower sections of new roofs to protect against water backing up under shingles, in its roofs‑and‑attics guidance in Keeping the Heat In – Section 5 which describes these membranes as a key part of winter roof assemblies. The same guidance also makes it clear that these membranes do not stop ice dams from forming; instead, they act as a waterproof backup layer so that meltwater from an ice dam cannot easily leak into the house.
A technical letter from GCP Applied Technologies, the manufacturer of GRACE ICE & WATER SHIELD® roofing underlayment, reinforces this point by stating that self‑adhered underlayments are designed to protect roofs from leaks caused by ice dams and wind‑driven rain, but that effective control of ice dam formation still depends on proper insulation and ventilation to limit heat transfer into the attic, as described in Insulation and Ventilation to Limit Ice Dam Formation which emphasises that underlayments are only one part of a larger system.
So, in practical homeowner terms:
Ice and water shield does:
Provide a self‑sealing waterproof barrier at high‑risk areas (eaves, valleys, penetrations).
Limit leaks if an ice dam forms or if wind‑driven water gets under shingles.
Offer a “second line of defence” when snow loads and freeze‑thaw cycles are severe.
Ice and water shield does not:
Prevent ice dams by itself.
Increase the structural snow load capacity of your roof.
Fix a warm attic, poor ventilation, or inadequate insulation.
Important
If a contractor describes ice and water shield as a complete solution to ice dams, ask follow‑up questions about attic air sealing, insulation, and ventilation. Federal guidance from Natural Resources Canada in Keeping the Heat In – Section 5 and manufacturer guidance from GCP Applied Technologies both stress that membranes are a backup, not a cure‑all.
Strategic Placement Around Eaves, Valleys, And Penetrations
Where you place ice and water shield determines how well your roof handles Canadian snow and ice. Natural Resources Canada identifies eaves and roof edges with limited insulation depth as major ice‑dam risk zones and recommends self‑sealing membranes in these lower sections as a way to prevent leak‑through when ice dams form, in the ice‑dam discussion of Keeping the Heat In – Section 5 which focuses on the warm‑to‑cold transition near exterior walls.
Industry practice, consistent with the technical guidance from GCP Applied Technologies on ice‑dam control, typically concentrates self‑adhered membranes in specific “high pressure” zones:
Continuous ice and water shield from the edge up past the interior wall line, per code and manufacturer specs
Valleys (where two slopes meet)
Concentrated runoff and snow accumulation; high leak potential
Full‑width membrane centred in the valley before valley metal and shingles are installed
Roof‑wall intersections and step flashings
Snow and water can be driven sideways into flashing joints
Membrane run up the roof plane and lapped behind wall flashing or under wall cladding where accessible
Around chimneys, skylights, and penetrations
Multiple flashing seams and penetrations; snow and ice can back up around curbs or collars
Membrane extending up around curbs and under counter‑flashings, tied into the main eave membrane where possible
Lower sections below upper roof dump zones
Upper roofs can avalanche snow onto lower roofs, overloading small areas
Wider membrane “pads” at the impact zone to handle extra ice and meltwater
Along low‑slope edges or wide overhangs
Snow melts slowly; water may sit longer near edges
Extended membrane coverage beyond minimum code distance in high‑risk climates
Always follow local building‑code requirements and the membrane manufacturer’s installation instructions, since they specify exact coverage distances, overlaps, and fastening patterns, which are critical to performance and warranty.
Tip
If you are re‑roofing in a cold or very snowy part of Canada, ask your roofing contractor to show you on a drawing exactly where ice and water shield will be installed, and consider matching or exceeding the edge coverage suggested in Natural Resources Canada’s roof‑and‑attic guidance in Keeping the Heat In – Section 5 especially at eaves, valleys, and along lower roofs that see frequent snow slides.
Building Your Pre-Winter Roof Maintenance Checklist
Exterior And Roof Surface Checks
A roof that is structurally designed for snow can still fail early if shingles are cracked, flashings are loose, or gutters are clogged with debris before the first storm. A Building America guide on managing snow loads notes that ice build‑up at clogged drains and scuppers can increase local loads and drive meltwater into the building, and it emphasises the importance of pre‑season inspections of drainage paths and roof surfaces, as outlined in the snow‑load maintenance advice from the Building America Solution Center which targets both roofs and decks.
A Canadian roofing guide from Everflow Roofing recommends homeowners schedule a roof inspection and basic maintenance before winter to catch loose shingles, damaged flashing, and known weak spots before they are buried under snow, and it also suggests considering snow‑removal planning once more than about a foot of heavy, wet snow accumulates, especially if there are any signs of distress.
Here is a practical exterior checklist you can review with binoculars from the ground or during a professional inspection in late fall:
Task
Where To Look
DIY Or Pro?
Why It Matters In Winter
Check shingles for curling, cracking, gaps
Entire roof, especially windward edges
Often visible DIY; repairs by pro
Damaged shingles are weak points for meltwater intrusion under snow and ice
Inspect metal flashings and drip edges
At eaves, valleys, chimneys, sidewalls
Pro or experienced DIY
Loose flashing is a common leak source when snow melts and refreezes
Clear gutters and downspouts
All eaves and discharge points
DIY with caution
Blocked gutters keep meltwater at the roof edge, worsening ice dams and overflow
Confirm downspout extensions or splashpads
At grade below downspouts
DIY
Moves large meltwater volumes away from the foundation during thaws
Look for ponding or soft spots on low roofs
Flat or low‑slope sections
Pro
May indicate poor drainage or deteriorating membrane before added snow load
Evaluate tree branches overhanging the roof
Around the full perimeter
Arborist / pro
Snow‑laden branches can fall onto the roof or scrape off protective granules
Inspect caulking at roof‑wall joints
Along dormers and sidewalls
Pro
Failed sealant can compound flashing issues when meltwater is driven sideways
Warning
Avoid walking on steep or high roofs for inspection. Use binoculars from the ground, or hire a qualified roofer with proper fall‑arrest equipment, particularly in icy or frosty conditions. Snow‑load guidance from the National Research Council of Canada in Codes Canada – Frequently Asked Questions explicitly cautions homeowners against clearing roofs themselves from above.
Attic And Interior Checks
What happens below the roof deck is just as important as the condition of the shingles. Natural Resources Canada states that the preferred long‑term solution for most houses to prevent ice damming is to keep house heat out of the attic by thoroughly air‑sealing and insulating the ceiling, and that ventilation plays a secondary, supportive role, in its guidance on ice‑dam control in Keeping the Heat In – Section 5 which emphasises an “air‑seal first, insulate second, vent third” strategy.
A winter ice‑dam guide for Ontario from DKI Burlington recommends that many homes in cold climates target an effective attic insulation level around R‑50 to R‑60 using blown cellulose or fibreglass, both to reduce heat loss and to keep the roof deck colder so snow is less likely to melt unevenly. That same article ties performance directly to balanced attic airflow and clear ventilation paths, not just raw R‑values.
To understand whether your attic is helping or hurting your winter roof performance, focus on three questions:
Is the ceiling plane reasonably airtight?
Look for obvious gaps at attic hatches, pot lights, plumbing penetrations, and open chases. Air leakage carries heat and moisture into the attic far more quickly than diffusion alone, a point reinforced by the emphasis on air‑barrier continuity in a Canadian R‑value guide from Metal Pro Buildings which notes that air movement is responsible for the majority of water vapour entering wall and roof assemblies.
Is the attic insulation level close to modern targets?
Many Canadian homes built decades ago have only R‑20 to R‑30 in the attic, whereas a national R‑value chart for Canadian regions highlights R‑50 as a minimum and R‑60+ as an ideal attic target for general Canadian conditions, according to Metal Pro Buildings – Canada’s R-Value Insulation Chart which summarises recommended attic levels by province and climate zone. If your attic is visibly well below the top of the joists, topping up may be one of the highest‑impact winter upgrades you can make.
Is the attic ventilation balanced and unobstructed?
Natural Resources Canada suggests that peaked roofs with accessible attics should generally follow a rule of thumb of about one unit of unobstructed vent area for every 300 units of insulated ceiling area, with adjustments for screening and baffling, in its ventilation guidance in Keeping the Heat In – Section 5 which also warns that ventilation alone will not solve problems caused by air leakage.
A quick interior and attic‑focused checklist might look like this:
Task
Where To Look
DIY Or Pro?
Winter Benefit
Check ceilings for stains or past leak marks
Top‑floor ceilings, around chimneys and skylights
DIY visual
Reveals early signs of ice‑dam or flashing leaks before they worsen under new snow
Inspect attic hatch weatherstripping and latch
At attic access panel
DIY upgrade
Reduces warm, moist air leakage into the attic
Measure or estimate insulation depth
Attic floor between joists
DIY assessment; pro top‑up
Confirms whether you are near R‑50–R‑60 targets recommended in Canadian guides
Verify soffit vents are not blocked by insulation
At roof eaves from inside attic
Pro or careful DIY
Ensures cold air can enter at eaves to support balanced ventilation
Confirm clear upper vents (ridge or roof vents)
Attic and roof exterior
Pro
Provides exhaust path for attic air, preventing stagnation and moisture build‑up
Look for frost or mould on underside of sheathing
Attic roof deck
Pro investigation
Indicates ongoing condensation from air leakage and poor ventilation
Tip
A smart pre‑winter move is to combine an attic air‑sealing and insulation upgrade with a ventilation check in one project, following the “seal‑insulate‑ventilate” sequence outlined by Natural Resources Canada in Keeping the Heat In – Section 5 so you avoid covering up air leaks with insulation before they are addressed.
Advertisement — Article Continues Below
Stopping Attic Heat Loss And Preventing Ice Dams
Air Sealing, Insulation, And Ventilation Working Together
Ice dams are not primarily a roofing‑material problem; they are a building‑science problem. When warm air leaks into the attic and heats the roof deck, snow melts on the upper, warmer sections and the meltwater runs down to the colder eaves, where it refreezes and builds a ridge of ice. That ridge then traps more meltwater behind it, which can back up under shingles and leak into the house unless an ice and water shield membrane is present.
Natural Resources Canada emphasises that the most effective long‑term strategy is to minimise heat transfer from the house into the attic through thorough air sealing and insulation of the ceiling, and then use attic ventilation to carry away any remaining warmed air, in its ice‑dam prevention guidance in Keeping the Heat In – Section 5 which explicitly cautions that ventilation alone will not prevent condensation or ice‑dam issues caused by air leakage. This is echoed by GCP Applied Technologies which describes proper insulation and ventilation as critical companions to self‑adhered underlayments.
A practical way to think about upgrades is:
Air sealing: Close the main pathways for warm interior air to reach the attic (attic hatches, pot lights, plumbing stacks, top‑plate gaps).
Ventilation: Provide continuous, unobstructed soffit intake and ridge or roof‑level exhaust in a ratio close to the 1:300 rule of thumb described by Natural Resources Canada in Keeping the Heat In – Section 5 ensuring fresh, cold air can flush the attic.
This matrix summarises common improvement options:
Improvement
Primary Effect
DIY Or Pro?
Impact On Snow And Ice Dams
Seal attic hatch with gasket and latches
Reduces large air leakage path
DIY or handyman
Less warm air in attic; cooler roof deck, especially near access points
Air‑seal pot lights and ceiling penetrations
Blocks air leaks at fixtures and chases
Pro (often requires electrical awareness)
Major reduction in convective heat loss into attic
Add blown cellulose or fibreglass to R‑50–R‑60
Increases ceiling thermal resistance
Pro insulation crew
Keeps heat in living space; roof stays closer to outdoor temperature
Supports balanced ventilation; reduces moisture and temperature build‑up in attic
Add or upgrade ridge / roof vents
Increases exhaust capacity
Pro roofing contractor
Helps evacuate warm air and moisture, complementing but not replacing air‑sealing efforts
Warning
Be cautious about adding powered attic fans without first addressing air leakage and insulation. Natural Resources Canada notes in Keeping the Heat In – Section 5 that ventilation cannot compensate for significant air leakage, and exhaust fans can draw more warm, moist house air into the attic if the ceiling plane is not airtight.
Warning Signs Of Excessive Snow Load Or Structural Distress
You do not need engineering software to spot some of the classic warning signs of a roof under too much stress. The National Research Council of Canada advises homeowners to watch and listen for unusual behaviour during and after heavy snowfalls, including new or loud creaking sounds from the roof or supporting walls, visible wall movement, sagging ceilings, new cracks in drywall or plaster, doors that suddenly jam, and leaks appearing after storms, in the snow‑load warning section of Codes Canada – Frequently Asked Questions which lists these symptoms as red flags.
Here is a quick reference:
Red Flag
What It Might Indicate
How To Respond
New cracking or popping noises from roof area
Structural members or fasteners under unusual load
Treat as urgent; contact a structural engineer or building professional
Interior doors suddenly sticking or jamming
Load‑induced distortion of frames or walls
Combine with other signs to assess; call a pro if multiple symptoms appear
Noticeable sagging in ceilings
Overstressed joists or trusses
High priority; avoid occupied rooms directly under badly sagging sections until assessed
Fresh cracks in drywall or plaster near ceilings
Movement of framing under snow load
Have a professional inspect framing and loads, especially after major storms
New leaks during or right after heavy snow
Ice‑dam backup or flashing failure under load
Arrange for roofing and attic inspection; consider temporary mitigation and snow‑load reduction
If any of these signs appear in combination—say, sagging plus new cracks and jamming doors—treat it as a potential structural emergency.
Important
If you suspect your roof is dangerously overloaded, leave the building if you feel unsafe and contact local building officials or a structural engineer. The National Research Council of Canada recommends on‑site assessment by qualified experts for suspected overload situations in its snow‑load guidance in Codes Canada – Frequently Asked Questions which stresses that design assumptions and actual conditions can differ.
Safe Snow Removal And Ongoing Winter Management
Once snow is already on the roof, the goal is to reduce risk without creating new problems. The National Research Council of Canada explicitly warns homeowners not to clear roofs themselves from above and instead to use qualified and insured snow‑removal contractors, noting that limited ground‑based raking may be acceptable where the roof is reachable, in its homeowner advice on snow removal within Codes Canada – Frequently Asked Questions which emphasises fall and impact hazards.
A technical guide on snow‑load management from the Building America Solution Center adds that snow removal should be carried out in a way that avoids creating unbalanced loads or damaging roof membranes—recommendations such as removing snow uniformly from both sides of a ridge on sloped roofs and leaving a thin protective layer of snow over membranes to prevent shovels from gouging.
A Regina homeowner’s guide from Everflow Roofing suggests that it is often time to consider removal when more than about a foot of heavy, wet snow is present, particularly if combined with ice or rain‑on‑snow events, and stresses that any strange sounds or visible sagging should override “rules of thumb” and trigger an immediate call to a professional.
Note
For most detached homes, the safest homeowner‑level snow‑management strategy is:
Use a roof rake from the ground to reduce edge loads in high‑risk storms, where safe.
Keep gutters and downspouts clear so meltwater has somewhere to go.
Leave full‑roof snow removal to insured professionals with proper fall‑protection equipment.
Advertisement — Article Continues Below
FAQ
There is no single number that fits every Canadian home. The National Research Council of Canada notes that roofs for houses and small buildings are designed according to location‑specific snow‑load values based on long‑term snowfall data and must support at least about 1 kPa (≈21 psf), with higher values in snowier regions, in its snow‑load discussion in Codes Canada – Frequently Asked Questions which also stresses that only a local expert can verify the design load for a specific house.
Depth alone is misleading because fluffy, cold snow weighs far less than wet, dense snow. The National Research Council of Canada explains that it is really the weight of the snow, not how deep it appears, that determines whether a roof is overloaded, using the example of light fluffy snow versus heavy slushy snow in Codes Canada – Frequently Asked Questions which cautions against relying on depth alone.
Yes, design loads are higher in very snowy regions. A snow‑guard manufacturer summarises typical design roof snow load ranges of 3.5–4.0+ kN/m² in places such as Newfoundland, Yukon, and Nunavut compared with around 1.8–3.0 kN/m² in Ontario and Quebec, as described in a Canadian snow‑load overview by Safe Roof Experts which reflects the more severe snow climates in those areas.
Not necessarily. A Regina roofing guide suggests planning removal when you have more than about a foot of heavy, wet snow or when snow and ice are accumulating unusually, but it emphasises that signs of structural stress—noises, sagging, new cracks, or leaks—should prompt immediate action regardless of depth, according to Everflow Roofing – How Much Snow Can a Roof Hold? which combines depth guidance with safety cues.
Warning signs include unusual sounds from the roof or walls, sagging ceilings, doors that suddenly jam, new cracks in drywall or plaster, and leaks that appear after heavy snowfall, all of which are listed by the National Research Council of Canada as indicators of excessive snow load in the snow‑load section of Codes Canada – Frequently Asked Questions which recommends contacting a professional if these symptoms appear.
At minimum, code requires self‑sealing membrane along the lower portion of the roof at eaves to protect against ice‑dam related leaks, and federal guidance recommends extending it up past the interior wall line and using it in valleys and other high‑risk areas, as explained in the roofs‑and‑attics chapter of Keeping the Heat In – Section 5 which highlights eaves and edges with limited insulation depth as key locations.
No. A self‑adhered membrane is a leak‑protection layer, not a cure for the underlying ice‑dam cause. Natural Resources Canada explains that these membranes help prevent water from ice dams from leaking through the roof deck but do not prevent ice‑dam formation itself in Keeping the Heat In – Section 5 and a technical letter from GCP Applied Technologies reiterates that insulation and ventilation are still needed to limit ice dams.
Many Canadian energy‑efficiency and contractor guides suggest targeting around R‑50 to R‑60 in the attic for most cold regions to reduce heat loss and keep the roof deck cold, a range highlighted in both an Ontario‑focused winter guide from DKI Burlington and national R‑value tables compiled in Metal Pro Buildings – Canada’s R-Value Insulation Chart.
Not by itself. Natural Resources Canada cautions that attic ventilation alone will not prevent condensation or ice‑dam problems caused by warm, moist air leaking into the attic and emphasises that an airtight ceiling is still required, in its guidance on attic performance in Keeping the Heat In – Section 5 where ventilation is presented as a secondary measure after air‑sealing and insulation.
For many peaked roofs with accessible attics, Natural Resources Canada suggests a general ratio of one unit of unobstructed vent area for every 300 units of insulated ceiling area, with adjustments when screens or baffles reduce the free area, as outlined in its ventilation recommendations in Keeping the Heat In – Section 5 which uses that rule as a practical design guide.
A Canadian R‑value chart shows that closed‑cell spray foam and polyisocyanurate rigid foam offer higher R‑values per inch than fibreglass or cellulose, making them useful in shallow spaces where thickness is limited, as described in the material comparison table in Metal Pro Buildings – Canada’s R-Value Insulation Chart which lists typical R‑value ranges per inch for common insulation materials.
Metal roofs tend to shed snow more readily because of their smooth surface, which can reduce long‑term loading on upper slopes but may increase snow‑slide hazards near entrances, and a Canadian snow‑guard guide notes that snow retention systems are often essential on standing‑seam metal roofs in high‑snow regions to protect people and property from sliding snow and ice, according to Safe Roof Experts – Where Are Snow Guards Required in Canada and the USA? which discusses metal‑roof projects extensively.
Snow guards are especially useful on metal roofs above entrances, walkways, and driveways where sliding snow could injure people or damage vehicles, and they are widely recommended in regions where roof snow loads exceed about 1.5 kN/m² for both commercial and many residential buildings, as discussed in the Canadian and U.S. guidelines from Safe Roof Experts which summarise when snow‑retention is expected.
Yes. A snow‑load management guide from the Building America Solution Center covers decks specifically and notes that they often see the same snow as the roof but may not be designed for equal loads, recommending that homeowners consider clearing decks more frequently and checking connections to the house.
Many roofing contractors suggest a professional inspection every few years, or after extreme weather events, and a Regina homeowner guide emphasises pre‑winter inspections as an opportunity to catch damage and plan any snow‑load mitigation before storms arrive, as noted by Everflow Roofing – How Much Snow Can a Roof Hold? which frames annual checks as part of winter preparedness.
For many older Canadian homes, topping up attic insulation to around R‑50 or R‑60 and sealing obvious air leaks at the ceiling plane is the most impactful first step, and this combination is highlighted by both Natural Resources Canada and multiple contractor guides, including the Ontario winter guide from DKI Burlington which links attic upgrades directly to fewer ice dams and lower heating bills.